

Cake Decorating Really Useful Box
*This post may contain affiliate links. Please see my disclosure for more details!*
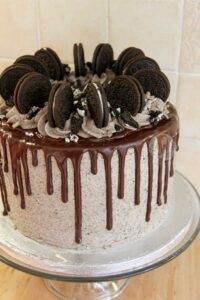
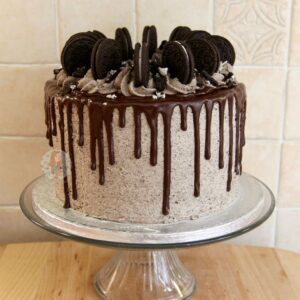
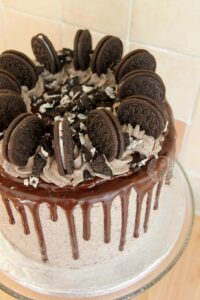
A 3-layer Chocolate Cake, with Oreo Buttercream, a Chocolate Drip, and Even More Oreos Make a Delectable & Showstopping Oreo Drip Cake!

One of my Dad's work colleagues had their last day recently, and I wanted to bake something special as they have been one of my taste testers, and she's so lovely… so I went for a Drip Cake.
Admittedly I did make the cake and have written a blog post about it, but I can't afford to not to post this when it was so damn delicious!
I didn't actually get to eat the cake, but I had a few spoonfuls of the buttercream whilst decorating as you know, they accidentally fell into my mouth, but the lucky lady and the rest of my Dad's Colleagues said it was divine!
I've been wanting to do another Oreo recipe in a while, so doing a Drip Cake was ideal. I used the same Buttercream recipe from my Oreo Cupcakes which I posted ages ago, yet have always used.
I decided to use about 300g of butter for the buttercream, and then 650g of icing sugar. Adding in the entire packet of crushed Oreo's made it the perfect amount to fill the cake, decorate the cake, and pipe on top of the cake!
I used the same idea for the cake from my Salted Caramel Drip Cake, just using less Self-Raising Flour, and adding in some cocoa powder to make it chocolatey.
I tried a new method of doing the Drip on this cake, by using oil. I've seen people having a few problems making the ganache drip as ganache can be quite temperamental, so after reading up on the oil method I had to try it!
You only use between 1-2tbsp of oil for this amount of chocolatey, and you can't detect it once its added. It just makes the chocolate runnier, and easier to use, whilst keep its shine. You can just use melted chocolate, but often this can be harder to use as its thicker, and it well set very solid.
If you wanted to use a ganache however you can, simply use 150g of Dark Chocolate and 150g of Double Cream! (Read about the ganache drip here.. Caramac Cake)
I adored making this cake. I found using the Oreo Buttercream easier to cover the sides for some reason (not entirely sure why!). And then making it all drippy and delicious was heavenly. I'm surprised I didn't eat some of it myself, but I resisted to make sure it look better… But anyway, any questions then message me on Facebook, or comment below! Enjoy!


Cake Ingredients
- 400 g Unsalted Butter/Stork
- 400 g Light Brown Sugar
- 400 g Eggs (roughly 8 medium)
- 325 g Self Raising Flour
- 75 g Cocoa Powder
- 2 tsp Baking Powder
- 4 tbsp Whole Milk
Oreo Buttercream Frosting
- 300 g Unsalted Butter (room temp)
- 650 g Icing Sugar
- 154 g Oreos (1 pack)
- 2-5 tbsps Whole Milk
Decoration
- 175 g Dark Chocolate
- 1-2 tbsps Vegetable/Sunflower Oil
- Oreos
- Crushed Oreos
For the Cake!
-
Heat the oven to 180C/160C Fan and line three 20cm/8inch cake tins with baking parchment – leave to the side.
-
In a stand mixer, beat together the butter and light brown sugar until light and fluffy. Add in the flour, cocoa powder, beaten eggs, baking powder and beat again briefly till combined – try not to over beat the mixture! If its really thick, mix in the whole milk to loosen.
-
Divide the mixture between the three tins and smooth it over – bake for 25-30 minutes until a skewer comes out clean when poked, and when the cake springs back.
-
Once baked, leave the cake to cool in the tin for 10 minutes, and then remove and leave to cool fully on a wire rack. If the cake has domed slightly, leave the cake to cool upside down to flatten it slightly.
For the Decoration!
-
In a stand mixer, beat the room temperature butter with an electric mixer until it is smooth and loose and then beat in the icing sugar 1/3 at a time until its fully combined. Keep beating the buttercream for a few minutes so it starts to get fluffier and lighter.
-
In a food processor, blitz the packet of Oreo's to a fine crumb, and add into the buttercream. Beat the buttercream again till smooth, and use the Milk to loosen it to a smooth consistency.
-
Once the cakes are cooled, put the first layer on the serving plate spread some of the buttercream onto the top of the first layer, add the second cake on top, and then top again with some of buttercream and then add the final sponge layer. Only use about 2 tbsps of buttercream per layer so that you have enough to decorate with!
-
With the leftover buttercream, as you can see, I covered the sides (and top) too! Do a first layer of around the edge and top using a large metal scraper and refrigerate for 10 minutes. Repeat again with a slightly thicker layer of buttercream.
-
I slather it on all over using an off -set spatula, and then run the metal scraper round until its smooth. If the Oreo's were blitzed to a really fine crumb like you need, the buttercream can still be smooth around the edges even though there is biscuit in the mix!
-
Once finished, melt the dark chocolate in a heat proof bowl until melted. Add in 1tbsp of oil and beat till smooth, continue to add oil till you get to a drippy consistency. I used 1+1/2 tbsps total. Using disposable piping bags, pipe it round the edge of the cake, edging over slight bits to create the drip.
-
You don't need to use too much per drip as it'll drop quite far down by itself! Fill in the top in with the rest of the chocolate so the top is also covered. Refrigerate the cake for about 15 minutes.
-
Using some left over buttercream, pipe little rosettes of buttercream onto the top and add a whole oreo – sprinkle on some crushed oreos and huzzah! You're done! Enjoy!
- You obviously don't have to make straight edged buttercream if you don't want to, but I just like the look of it! You can slather it on, and it'll still taste damn delicious.
- However, if you do want to make it like this, I seriously recommend using a metal scraper for the decoration of the buttercream, and the disposable piping bags.. I wouldn't be anywhere without them!
- All of the decorations are completely optional – but I love this style of cake! To make a smaller version of the cake, use:
- Two 8″cake tins
- 300g Butter
- 300g Sugar
- 245g Flour
- 55g Cocoa Powder
- 1.5tsps baking powder
- 6 medium eggs
- 3 tbsps of Milk
- And it might take an extra 5-10 minutes to bake and use 2/3 of the decoration recipes!
- This cake will last in an airtight container for 3 days!
ENJOY!
Find my other Cake & Oreo Recipes on my Recipes Page!
You can find me on:
Instagram
Facebook
Pinterest
Twitter
Bloglovin'
Youtube
J x
©Jane's Patisserie. All images & content are copyright protected. Do not use my images without prior permission. If you want to republish this recipe, please re-write the recipe in your own words and credit me, or link back to this post for the recipe.
Cake Decorating Really Useful Box
Source: https://www.janespatisserie.com/2016/08/15/oreo-drip-cake/
Posted by: grangerapoing.blogspot.com
0 Response to "Cake Decorating Really Useful Box"
Post a Comment